
Appearance
Changing Schedules
An action is normally configured to run on an automated schedule either at scheduled times, or when a file is received for processing. As you business needs change you may need to change the schedule upon which the action is executed automatically.
- Open the Flow Designer
- Navigate to the
Actionsgroup - Single click the Action that you wish to edit. This will display the Action edit window.
- Select the
Executiontab and refer to the below information to change the schedule depending on what schedule mechanism you wish to use
Changing Run at Scheduled Intervals Actions
Select
Run at Scheduled Intervalsin theRun Action viagroup box. The following options are displayed.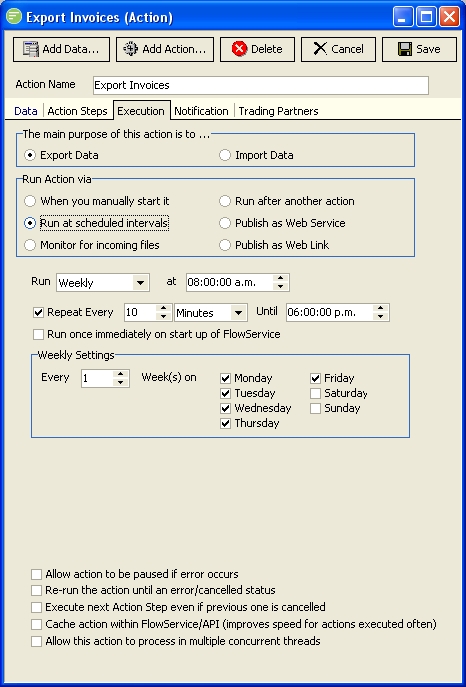
Set the
Runtype to eitherDaily,Weekly, orMonthly- For Daily mode you can specify daily frequency of the schedule
- For Weekly mode you can specify the weekly frequency of the schedule along with which days of the week the schedule will run on.
- For monthly mode you can specify the monthly frequency of the schedule along with which day of the month the schedule will run on. If you select a day that is greater than the number of days in a particular month it will run on the last day of the month (ie if set to 31 it will run on the 30th day of June)
Set the initial start time of the schedule
If you want to repeat the action during check the
Enable Re-occurring Schedulecheck box. The display will change to that shown above where you can set toRepeat EveryX seconds, minutes, or hours,Untilthe specified finish time.Check the
Run once immediately on start up of FlowServiceif you wish this action to execute once upon starting FlowService. After this it will continue to execute based on the given schedule.Check the
Allow action to be paused if error occurscheck box if you want the action to pause processing if an error occurs. This is useful if the schedule is set to repeat often. If not enabled the action will run at each repeat interval and send another error notification email. In cases where it takes you a while to respond to the error this could mean a large volume of error emails is sent. If enabled the action will pause after the first error and notify the operator based on the email notification settings. They can then resolve the error and resume the action. The operator will need access to FlowMonitor to resume a paused action.Check the
Re-run the action until an error/cancelled statuscheck box if you want the action to continue repeatedly each time the scheduled execution period occurs. This is normally used when you want the action to start up every 1 hour or so, and then run repeatedly until it processes all waiting data. Ths is commonly used when the action is configured to process files that cannot be monitored for. You will not normally need to change this item from how it was set when the action was configured for you.
Changing Monitor for incoming files Actions
Select
Monitor for incoming filesin theRun Action viagroup box. The following options are displayed.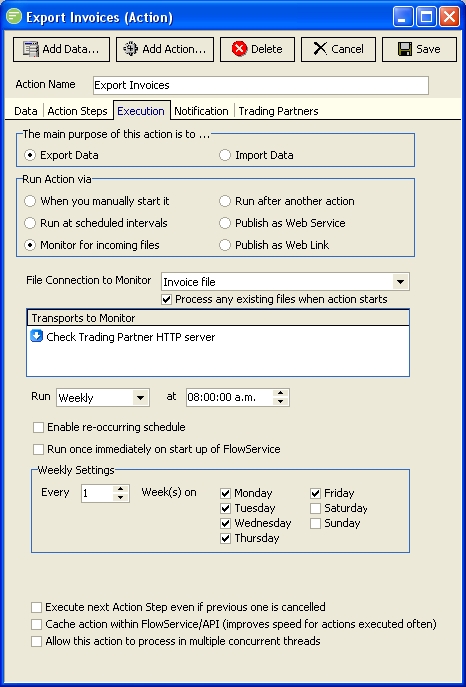
Set the
File Connection to Monitordrop down box to the appropriate File Definition. You will only be able to select File Definitions that are configured on this action in theDatatab. This indicates to the action which File to monitor for, when a file arrives in the monitored file connection the action will begin processing.Check the
Process any existing files when action startscheck box if you want FlowService to check for any existing files when it starts up. Due to the method employed to monitor for Files (a windows hook that is signalled only when new files arrive), any files that exist in the folder when FlowService starts will not be processed unless this check box is enabled. It is recommended that you leave this check box enabled.Add any inbound transports that you wish to monitor in the
Transport to Monitorlist box. The external transports you select will be checked on a scheduled basis to see if any new files are residing at them. If so they will be downloaded to the monitored file connection which will kick start the processing. The schedule settings will only display if one or more transports are selected. Configure these scheduled settings just as you would a schedule action (see above)