

Appearance
Logs Tab
In the Manage Logs screen, the Logs tab is split into two (2) distinct panes - the upper pane for selecting any search or display filter criteria, and the lower pane to list the Log entries that match the entered criteria.
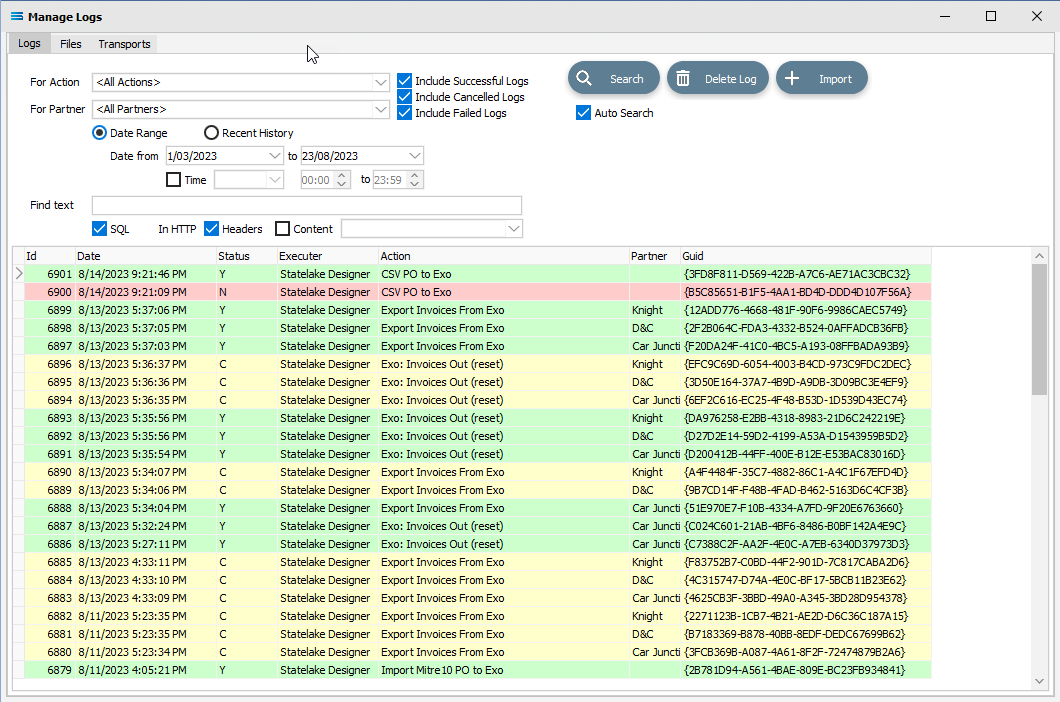
Fields
| Field Name | Description |
|---|---|
| For Action | Filter the Logs to only the ones created from the execution of this Action. The drop-down arrow will list all Actions in the configuration. The default is <All Actions>. |
| For Partner | Filter the Logs to only the ones created from the execution of an Action for this Trading Partner. The drop-down arrow will list all Trading Partners in the configuration. The default is <All Partners>. |
| Date Range | Select this radio button to filter records by a specific date range. |
| Date from | Only Logs created on or after this date will be displayed. |
| to | Only Logs created on or before this date will be displayed. |
| Time | The filter can be further enhanced by specifying a time range. The options are Between or From. The time fields require a from and a to time. |
| Recent History | Select this radio button to filter records by a specific recent time period. |
| In the last | This is a two-part field. Specify a number from 0 to 48, and select Minutes or Hours. |
| Find text | Enter text to be searched for. |
| SQL Search | Search for the entered text within the SQL statement section of any Log. Depending on the number of Log entries, using this function can take a very long time. Use the other criteria to first limit the number of Logs to a smaller subset, then apply this filter. |
| In HTTP | Search for the entered text within the HTTP section of any Log. Depending on the number of Log entries, using this function can take a very long time. Use the other criteria to first limit the number of Logs to a smaller subset, then apply this filter. |
| Headers | Search for the entered text within the Header section of any Log. Depending on the number of Log entries, using this function can take a very long time. Use the other criteria to first limit the number of Logs to a smaller subset, then apply this filter. |
| Content | There are three (3) options - Requests only, Responses only, and Requests and Responses. |
| Include Successful Logs | Select to include Logs with a Success or Warning status. These have a GREEN highlight. |
| Include Cancelled Logs | Select to include Logs with a Cancel status. These have a YELLOW highlight. Note - by default Cancel status Logs are not saved, you will need to enable these in the Notification tab of the Action configuration.  |
| Include Failed Logs | Select to include Logs with an Error status. These have a PINK highlight. |
| Auto Search | Select to have the filter settings automatically applied whenever one of the above fields is changed. |
| Logs List | Double click an entry to open the Log Detail viewer. |
Buttons
| Button Name | Description |
|---|---|
| Search | Click to apply the current filter settings to the list of Logs. |
| Delete Log | Click to Delete the selected Logs. You can use the <control> key to select multiple Logs for deletion - each Log record selected in this way will be identified with a . (full stop) and >> (double arrow). |
| Import | Click to Import a Template file containing a Log. You will be prompted for the location of the Template file. For more information refer to Importing Logs |